The Birth of an Unplanned Project
The idea to build a Spitfire was entirely spontaneous, but looking back over the three months it took to complete, I am so glad I took the plunge. This project wasn’t just about crafting. It was about connecting with the history of a place where I spend my time.
A Hero’s Legacy: Raimund Sanders Draper
Currently, I volunteer once a week at a school library. The school is named after Raimund Sanders Draper, an American pilot who served in the RAF during World War II.
A Note on the History: In 1941, when his Spitfire suffered engine failure shortly after takeoff, Draper chose to crash-land his plane into the school playing fields rather than bail out, ensuring the aircraft didn’t hit the building full of children. He heroically lost his life to save the students.
Finding Inspiration in the Library
Because of this history, the Spitfire is everywhere—it’s on the school logo and the information boards. However, as I looked around the library, I realized there was no large-scale model of this iconic aircraft. That’s when it hit me: it would be a wonderful idea to create a model myself and hang it from the library ceiling to inspire the students and honor the school’s heritage.
Turning Waste into Wings
The timing was perfect. I had just ordered a new wardrobe, which left me with a huge amount of cardboard and polystyrene foam. Instead of throwing it away, I realized these were the perfect materials for my project.
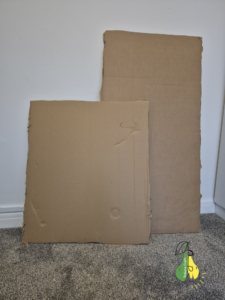
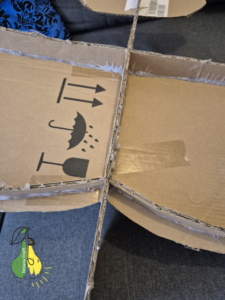
The story of the aircraft began with these two large sheets of cardboard you see in the photo below. It’s amazing how a piece of furniture packaging can eventually become a legendary fighter plane.
Drafting and The First Cut
Cutting the silhouette out of cardboard was a crucial first step. Since I had absolutely no prior experience in model aircraft building, I knew I needed reliable references. I printed out several high-resolution photos of the Spitfire and even ordered a small scale model from Amazon to study its geometry in 3D.
Building the Skeleton
Using these guides, I carefully cut out the main body of the aircraft. To ensure structural integrity where the wings meet the fuselage, I used a craft knife to make precise slits. I then inserted thin cardboard strips into these slots to create a sturdy frame for the wings. This “interlocking” method gave the model its initial shape and strength.
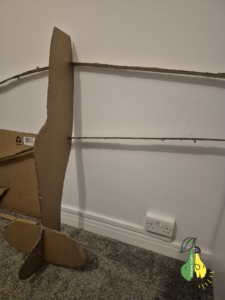
Shaping the Wings
Once the main frame was ready, I cut the wings out of cardboard. At this early stage, I used clear tape just to hold them in place and check the alignment. It was important to see the proportions before making anything permanent.
Securing the Joints
After I was satisfied with the positioning, I flipped the model over and reinforced all the joints using a hot glue gun. This provided a much stronger bond than the tape. Once the glue had fully set, I peeled off the temporary tape and carefully trimmed the edges where necessary to ensure the silhouette was sharp and accurate.
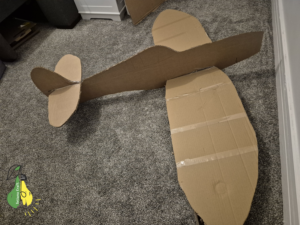
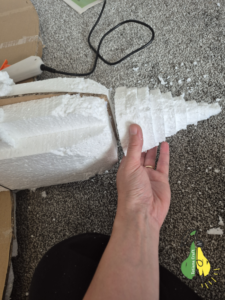
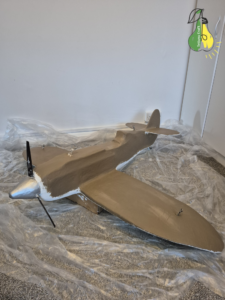
Adding Volume with Polystyrene
To give the aircraft its iconic rounded shape, I used polystyrene foam. It is a fantastic material for this purpose—incredibly lightweight and easy to work with. It allowed me to build up the volume of the fuselage without adding unnecessary weight, which was perfect since the final model needed to be light enough to hang from the ceiling.

Crafting the Propeller Spinner
One of the most satisfying parts was creating the propeller nose cone (the spinner). Using a block of foam, I was able to quickly carve out the shape. Because polystyrene is so forgiving, I could easily refine the curves and smooth the surface with a knife until the taper was just right.
Engineering for Strength
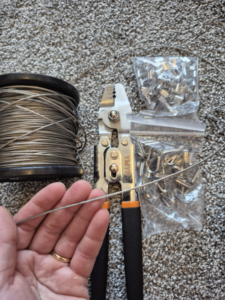
A crucial realization hit me: cardboard and foam are relatively soft materials, and the wings needed real structural support to prevent sagging. I explored various options and found an unexpectedly perfect, low-cost solution—a wooden mop handle.
I bought a brand new mop, cut off the head, and was left with a long, solid, and perfectly straight wooden spar and inserted this “spar” through the wings to act as a backbone. To secure everything, I used a steel cable system.

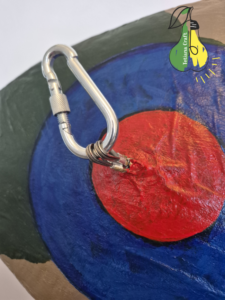
Rigging for Suspension
Since the plane was destined to hang from the ceiling, I needed a rock-solid suspension system. I installed steel cable loops at the front and back of the aircraft, resulting in four secure attachment points.
Pro Tip: To prevent the thin steel cable from cutting into the soft foam, I placed small pieces of rubber underneath the wire at the pressure points.
To get the job done right, I ordered a small rigging kit: steel cable, eyelets, ferrules, and a crimping tool to cut and secure the wires. This setup gave me complete confidence in the model’s durability and safety.
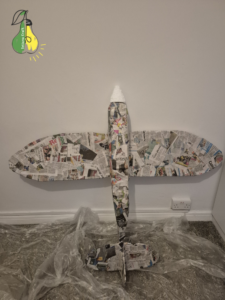
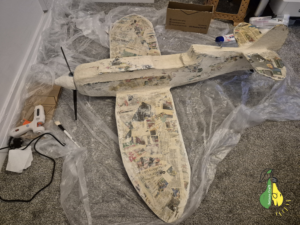
The Art of Papier-Mâché
Now came the most exciting part: layering the model with strips of newspaper. For this, I used a small ceramic bowl to hold my mixture. My PVA glue was quite thick, so I needed to dilute it with water to get the right consistency.
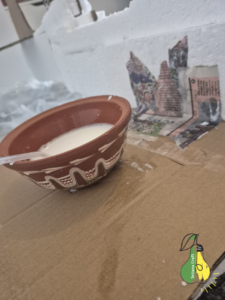
My Secret Weapon: To get a perfectly smooth mixture quickly, I used a small handheld milk frother (the kind used for cappuccino). This is a handy “life hack” I brought with me from Ukraine—it’s the perfect tool for mixing craft adhesives!
Building Form and Texture
In areas where the model needed more volume or better curves, I used crumpled pieces of newspaper to “sculpt” the shape. Once the foundation was right, I layered smooth strips of paper over the top to create a clean surface.
Keeping It Clean
It’s important to note that this stage is quite messy! To protect my floors, I used plastic dust sheets (drop cloths) which you can find in any DIY or hardware store. They usually come in packs of two. I ended up using both, replacing the first one once it got too covered in glue and paper scraps.
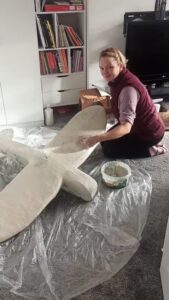
Sculpting with Paper Clay
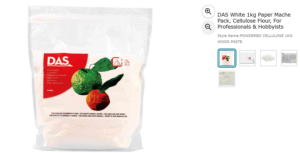
To achieve the fine curves and smooth contours of the Spitfire, I used a specialized modeling paste. I created my own mixture using DAS wood-based clay (cellulose-based) and diluted PVA glue. This resulted in a wonderfully plastic mass that was easy to work with and added significant strength to the surface once dry.
Achieving a Smooth Finish
I applied the paste using a putty knife (spatula), which allowed me to fill in any gaps and smooth out the transitions between the cardboard and foam. The only downside to this method is the drying time—it takes quite a while for the paste to harden completely. However, the patience paid off, as it created a rock-solid, sandable shell for the next steps.
Installing the Propeller
For the propeller itself, I decided to use a pre-made plastic part. This was a great time-saver and ensured the aircraft had a polished, professional look. To attach it, we found a very long threaded screw to act as the main axle.
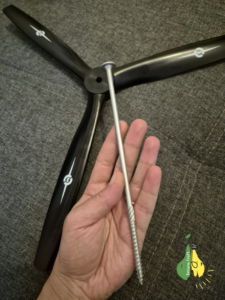
A Secure Fit
Since the plane will be hanging from a high ceiling, my priority was maximum durability rather than moving parts. My husband drilled a pilot hole into the fuselage, which I then reinforced by filling it with hot glue. He then securely fastened the propeller using the long screw.
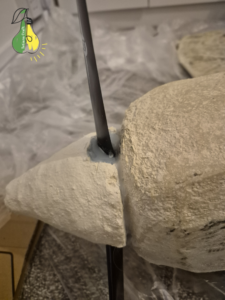
Finalizing the Nose Cone
Once the propeller was in place, it was time to attach the spinner (the nose cone). I carefully carved out recesses in the foam cone to match the shape of the propeller blades for a snug fit. I then bonded the spinner to the fuselage using a generous amount of hot glue, ensuring all seams were completely filled. The result is a rock-solid front assembly that looks authentic and, most importantly, is built to stay in place.
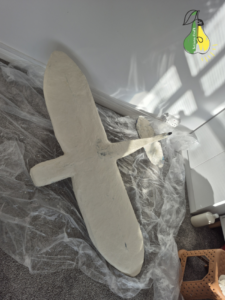
Sanding and Prepping the Surface
After the paste had finally dried, it was time for sanding. This is a vital step to remove any lumps and bumps, ensuring the Spitfire looks like it’s made of metal rather than paper and glue.
I decided to do the sanding outdoors to keep the dust out of the house. However, living in the UK, I had to be patient—I ended up waiting an entire week for the rain to stop before I could finally get outside and work on the surface!
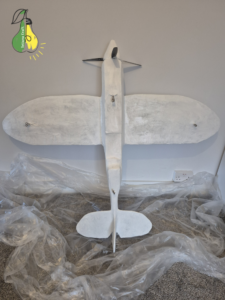
The Base Coat
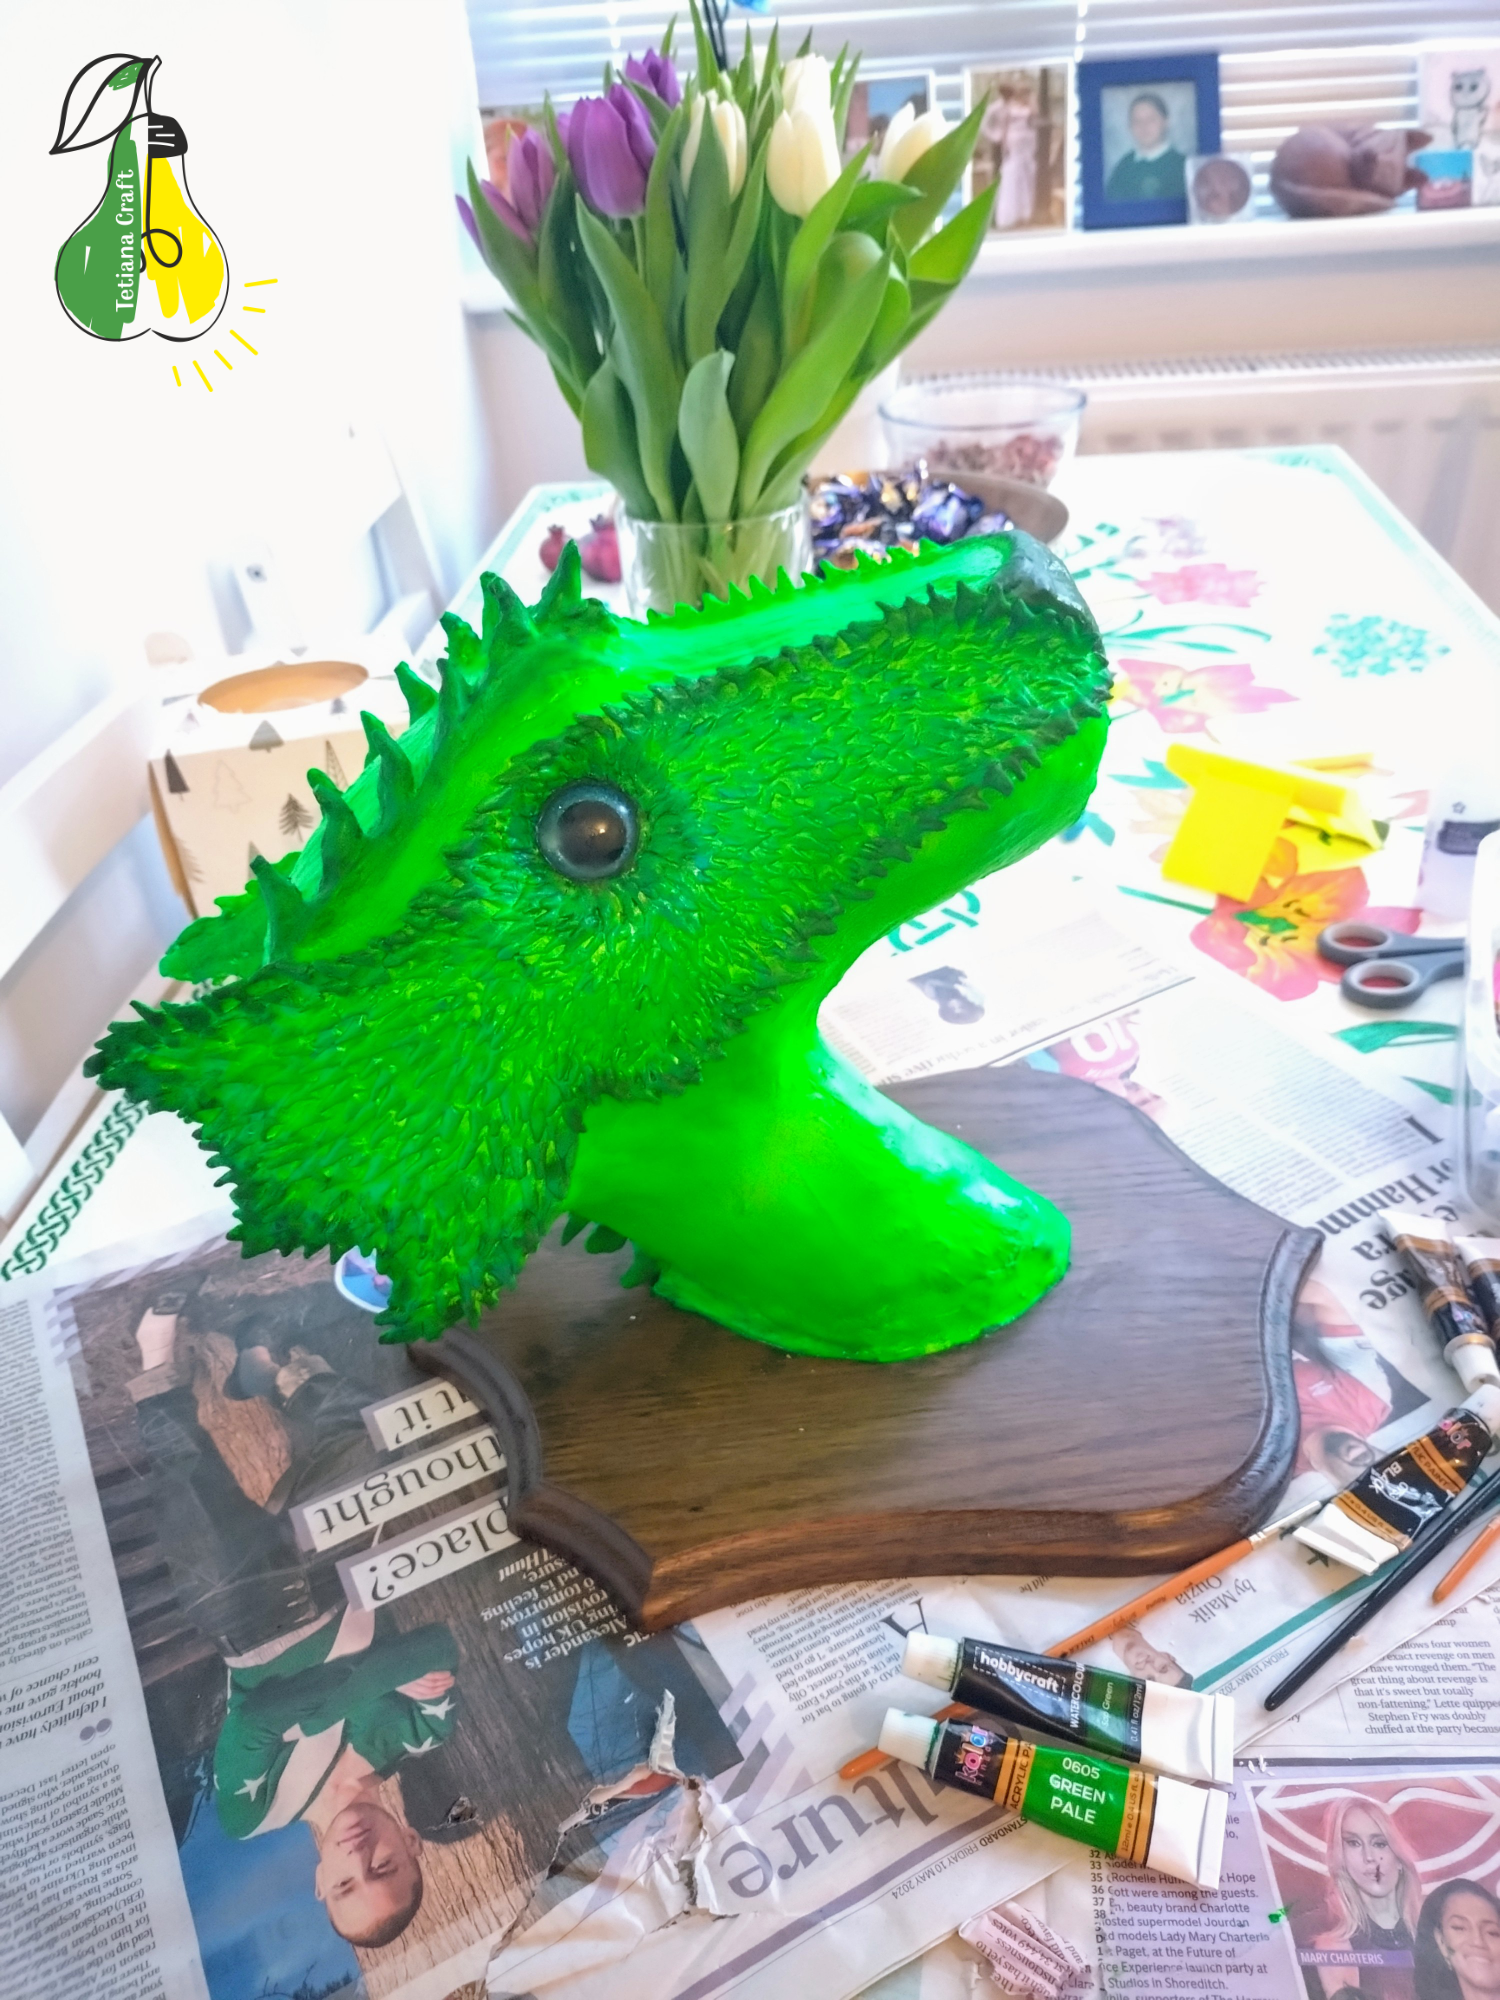
Once the fuselage and wings were smooth, I applied a layer of primer. Priming is essential because it seals the porous surface of the paper and clay, creating a uniform base for the final paint. Seeing the model in a single solid color for the first time was incredibly satisfying—it finally started to look like a real aircraft.
The Base Layer
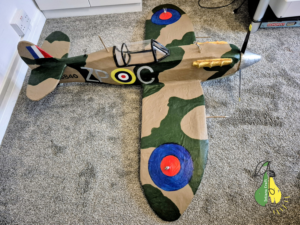
Once the primer was dry, I applied a solid coat of white acrylic paint. Using white as an undercoat is a great technique; it creates a clean, neutral canvas that helps the subsequent colors pop and stay true to their intended shade. At this stage, the Spitfire looked like a “ghost plane,” but it was finally ready for its iconic camouflage.
The Challenge of Camouflage
Finding the authentic shades for the camouflage proved to be quite a challenge. I researched the exact military hex codes and paint names used on original Spitfires, but I couldn’t find them in local craft stores. The specialized paints I found online were expensive and came in tiny jars designed for miniature models—far too small for my large-scale project.
Mixing by Eye
I decided to take matters into my own hands. I bought standard tubes of acrylic paint and began mixing the colors manually, comparing my results against historical photographs.
It was a process of trial and error. I learned the hard way that acrylics tend to dry a shade or two darker than they appear when wet. I actually had to repaint the brown sections because the initial coat turned out much darker than I intended. After some adjustments and color matching, I finally achieved that classic World War II look.
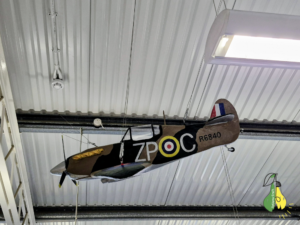
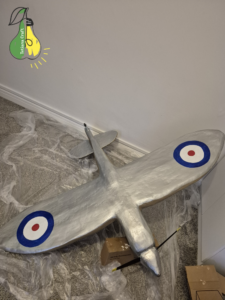
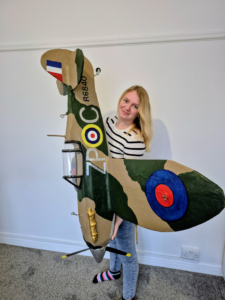
The Underbelly and the Iconic Roundels
For the underside of the aircraft, I chose a silver paint with a subtle blue tint to mimic the sky-camouflage used on real fighters. Once the base was dry, it was time for the most recognizable part of the Spitfire: the RAF roundels.
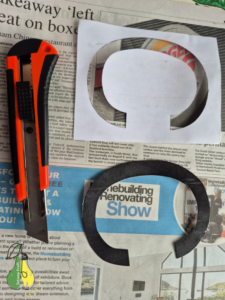
Kitchen Geometry
To get the circles perfectly symmetrical, I turned to my kitchen cupboards! I didn’t have a compass large enough, so I started measuring every round object I could find:
-
The outer circle was traced using a large plastic bucket.
-
The middle circle was perfectly sized from a glass salad bowl.
-
The inner red dot was shaped using the base of a candle.
It was like a puzzle, matching household items to the proportions I saw in photos. Tracing and painting them by hand was a meditative process, and seeing those bright red, white, and blue colors on the wings really brought the “Spit” to life.
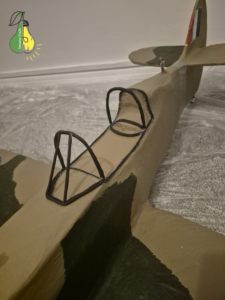
Engineering the Canopy
Once the main paintwork was finished, I moved on to the windows—the cockpit canopy. This proved to be one of the most challenging parts of the entire project. I experimented with several materials before finding the right combination for a realistic look.
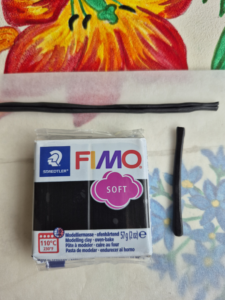
Frame and Glass
For the structural frame of the canopy, I used black Fimo clay (a polymer clay that you bake in the oven). After hardening the clay pieces, I carefully attached them to the fuselage using my hot glue gun.
For the “glass” panels, I used thin, transparent plastic sheets. I cut each pane individually and meticulously glued them into the frame. To finish it off, I used more black clay to seal the joints and refine the edges, then used a fine brush to touch up the paint where needed. It was delicate work, but the transparency of the canopy adds a whole new level of detail to the model.

Lettering and Historic Accuracy
For the identification letters on the side of the fuselage, I came up with another DIY solution. I printed the letters on a standard printer, covered them with clear tape for durability, and carefully cut them out using a craft knife. This gave me a set of homemade stencils that worked perfectly for painting the codes.
Attention to Detail
A small but important detail I had to keep in mind was the positioning of these letters. On a real Spitfire, the order of the squadron and aircraft codes is mirrored differently on each side of the fuselage. I made sure to replicate this historical layout correctly.
As for the roundels, as I mentioned before, they were all hand-painted using various kitchen items as guides. Combining the stenciled lettering with the hand-traced roundels really completed the authentic wartime look of the aircraft.
Final Details and Finishing Touches
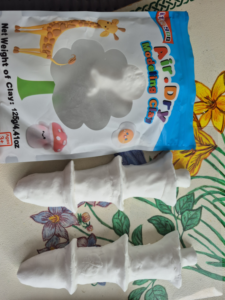
The final stage was all about the small details that make a model look realistic. For the antennas, I used bamboo skewers. To give them the right shape, I coated them with foam clay (air-dry clay) and painted them. To ensure they were securely attached, my husband drilled small pilot holes. I then filled them with hot glue and inserted the skewers while the glue was still molten.
Adding the “Guns” and Exhausts
I also used foam clay to sculpt the exhaust stacks (the long pipes near the propeller) and several other small elements on the underside of the fuselage. For one specific part, I used foamboard (a 5mm thick material with a foam core between layers of card), which is perfect for maintaining sharp, flat shapes.
The Final Polish
To add depth, I used a black pencil to draw in some of the panel lines and mechanical details on the bottom of the plane. Finally, once everything was perfect, I protected my three months of hard work by applying several coats of water-based acrylic varnish. This gave the Spitfire a consistent finish and a protective layer against dust.
Below you can see the final result.
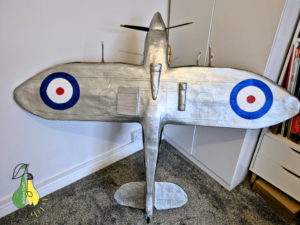
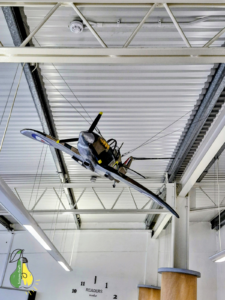
The Final Ascent
For the installation, we used the steel cables I had integrated into the frame, secured with heavy-duty carabiners. Hanging a model of this size required precision and care, but once it was locked into place, the transformation was incredible.
A Mission Accomplished
I absolutely love how the library looks now. Looking up at the Spitfire soaring beneath the ceiling, I realize that every hour of the last three months was worth it. I poured so much energy and heart into this project, and seeing it finished is deeply rewarding. What started as a completely spontaneous idea has finally taken flight, becoming a permanent part of the school’s story.